Mobilize
source the crowd
®


Mobilize
How to use Mobilize
Entering Contact & Demographic Info
How to:
On the campaign list view, you will see a contact icon on the bottom left hand corner of the screen. Opening this will allow you to enter your contact and demographic info. It is the same form that you will use to collect this data from the patrons you talk to.
By entering your info, you are giving important data to the organization that created the campaign. They will be able to know who is volunteering and what they are able to accomplish. By entering your contact details, the organization can personally recognize those people who volunteer and contact them if they choose. This information is optional and is bundled with the campaigns you submit to the org. It is not intended to be shared with any other party.
New Campaign
Using the Campaign Creation Tool - Making a New Campaign:
You will need to have both your personal computer and iPhone or iPad connected to the same wireless network. This works best at home or on another private network and may not work on a public network such as a library or coffee shop. Now open your browser and open mobilize.
On the top right of the campaign list view, you will see a plus sign. Go ahead and click this. You will see a popup with three options. These allow you to create a new campaign, import a campaign from your personal computer, or download one from the web. Go ahead and click Create New Campaign.
Now you should see a message prompting you to manually type in the address, starting with http, into the address bar of your browser.
If the connection between your iPhone and Computer is successful then you will see the create campaign page displayed on your browser.
You will want to take a look at all of the different elements within a Mobilize campaign. Make sure to type this info as a document, such as in Microsoft word, and save it so that you will have access to it in case something goes wrong in the creation process.
Now you can go ahead and fill in the information. When you are done, scroll to the bottom and click the Create Campaign button.
If the upload is successful, you will see a progress bar on your iPhone. This means that the campaign is being created, and that the media elements, such a pictures and video, are being downloaded from the url that you specified. If it is unsuccessful, try clicking refresh on the web browser. This usually does the trick. If this does not work then you will need to fill in the information again. In this event, having everything saved in a word document makes it a simple process of cut and paste.
Once the creation process is complete you will want to save a copy of the campaign by emailing it to yourself. In the list view, click on the blue arrow, scroll to the bottom, and click export campaign. Fill in the email address and send. Now you will have a copy of the campaign you just created. This is the file that you will share with your supporters.
Import Campaign - From File:
You will need to have both your personal computer and iPhone connected to the same wireless network. This works best at home or on another private network and may not work on a public network such as a library or coffee shop. Now open your browser and open mobilize.
From the campaign list view, click on the plus button in the top right corner. Click Import From File, and enter the url starting with http, into the address bar on your browser and press enter.
This will bring up the import campaign page on your browser. Click choose file, and find the campaign file on your computer. When you have selected the campaign file, click submit on the browser page.
If the import is successful, you will see the browser window change to green, and the import progress displayed on the iPhone. If there is a problem with the import, the browser window will display red. A problem can occur for two reasons. The network connection may not support the transfer, or your browser may have caused an error. The browser issue is common and often self-correcting. Attempting to import the file a few more times will usually do the trick.
A third error is possible. If the browser window displays green indicating a successful import, but the iPhone shows an error, this is because the media files which the campaign is trying to download have been moved or are corrupt. The creators of the campaign must fix this issue and you should notify them if you have this error.
Import Campaign - From Web:
If the creator of the campaign has the campaign file hosted on the internet, they can provide you with a web address that links to the file. You will need to know this url address in order to download from the web.
From the campaign list view, click the plus sign at the top right corner. Now click the Import From Web button. Simply copy the address into the space provided and Mobilize will automatically download the new campaign. If the process fails, it is due to an incorrect address or corrupt file in the campaign. If a failure occurs, you should try again several times, making sure the address you have input is exactly the same as the one provided. If after trying, you are unable to import the campaign then you should contact the campaign creator and let them know.
Campaign Details View
Description:
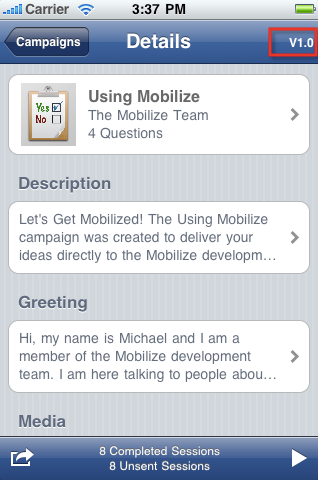
From the campaign list view you can click the blue arrow next to a campaign. This will bring up the details view. This window displays all of the content within that campaign. You can spend some time reviewing the content and becoming familiar with the campaign. In addition, by scrolling to the bottom you can share this campaign with others via email using the export button.
On the bottom left hand corner of the screen you will see a submit button with an arrow pointing up. This button is what you will use to submit the saved completed sessions that are unsent.
The arrow on the bottom right hand corner will take you to an active campaign which you can begin filling out with a patron.
On the bottom middle of the screen you will see a tally of completed sessions and saved session that still need to be submitted to the organization. To submit these unsent session, click on the submit button to the left of the tally.
Active Campaign
Overview:
An active campaign is the portion of Mobilize that you will use the most. It is where you will do your volunteer work and the portion that is most appropriate to let patrons view.
From the campaign list view click on a campaign to open an active session. The first time a session is opened you are given the option of displaying the greeting. The greeting is a page that helps you with approaching patrons. It may have a standard greeting, some bullet points you can use to introduce the campaign, or simply some helpful instructions. You can toggle the greeting to open every time a new active campaign is started or to only open when the silver clip in the middle top portion of the screen is pressed.
Sharing Info:
There are two elements of information within the active campaign for you to share with patrons:
Campaign Description - The second bubble from the top has text that describes the campaign.
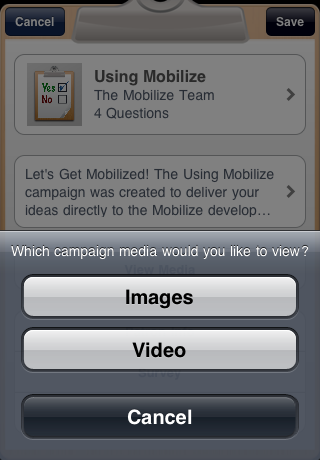
Media - The next bubble down contains both images and video for the campaign.
Collecting Info:
Patron Info - Here is where you will collect contact & demographic info from patrons. All the information entered is optional and intended to be shared solely with the organization that created the campaign. By scrolling to the bottom of this screen you will be able to get permission from the patron to register them for the e-mailing list.
Survey - The survey is very helpful for organizations and is even more effective when combined with demographic data.
Giving:
The donate button has two options, text message or web. Depending on how the organization has setup the campaign, the patron may be able to make donations via their mobile phone using a text message short code belonging to the campaign, or by using a web based tool such as Paypal or the organization’s website.
Submitting Completed Campaigns
How to:
Submitting a session sends all of the collected data directly to the organization. There are two ways to submit completed campaign sessions.
The first is to submit immediately after completing a session. In the active campaign view you will see a save button on the top right corner of the screen.
After completing a session you will press save. You then have the option of saving the campaign for submission at a later time, or submitting at that moment.
If you choose to submit later, then the session will be saved for later submission. To submit the saved sessions simply go to the campaign list view, then click the blue button for the details view, and click the submit button on the bottom left hand side of the screen.
NOTE: The session submission method will depend on the campaign settings. It will either be submitted via email or direct upload to your host. If via direct upload, then you Mobilize connect to the Internet and submit the campaign, if via email then you will need to manually press send.